How To Add A Role With Discord Bot When You Add Reaction
In this post, we’ll make a simple Discord bot for adding a role to users after reacting to a specific message. There are two parts of this tutorial, which are essential to make this application work. Firstly, you’ll need to setup the bot correctly from the Discord side. And secondly, you’ll need to code it of course.
In case you don’t have it already, you’ll need to make a Discord account and create a server. Before we jump into the bot setup, let’s first create a role on our server.
Setting up the Discord application
As we mentioned before, we’ll need to setup a Discord application first before we can code its functionality. In order to do this, we need to go the Discord developer portal and click on the “New Application” button.
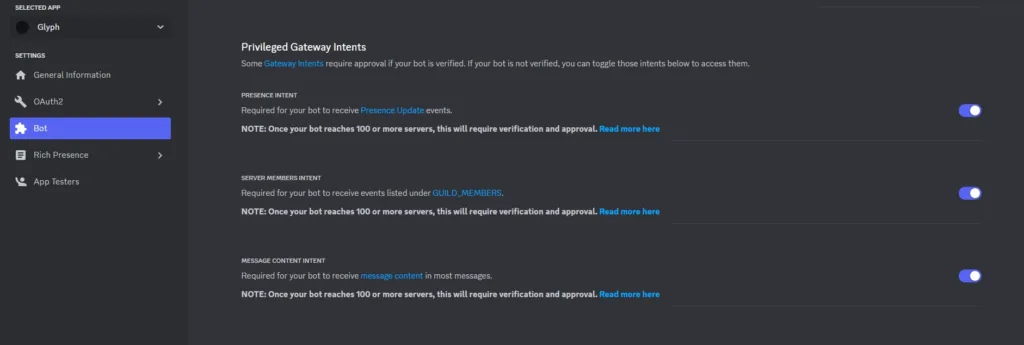
When you’re setting up the bot, it’s important to enable its intents under the Bot tab. Our bot in particular will need the server members intent, since it will manage roles for users.
Now we’re ready to invite our bot to the server. We can do that by going to the URL Generator under OAuth2 tab and select scopes and bot permissions. In this case, we can select bot under scopes and manage roles under bot permissions.

At the bottom of the page you’ll be able to see the generated link, which you can copy and paste it into your browser. Next, you’ll need to choose the server you want it to join and confirm its permissions.
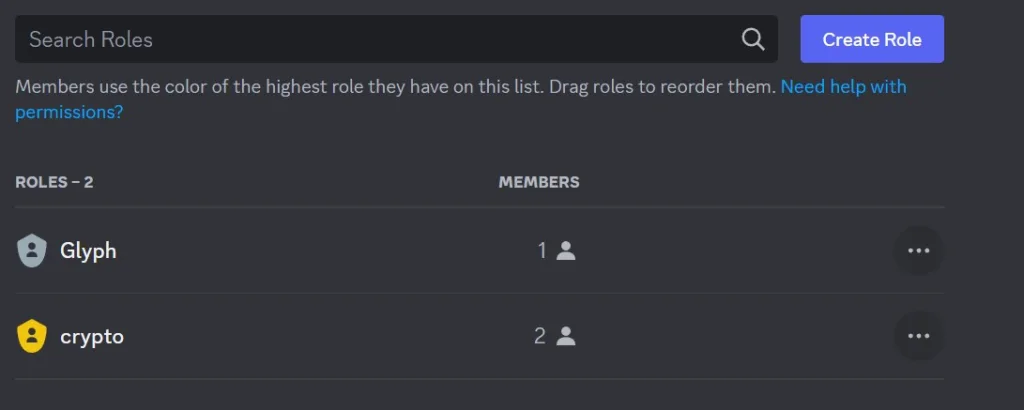
When you add your bot to the server, you’ll need to change the position of its role and set it above the role you want it to manage. And in case you’re giving your bot Administrator permissions, you’ll need to enable managing roles for the bots role separately.
Coding role managing Discord bot
Okay, now we’re ready to dive into the code. First of all, since we’re going to use Discord API, we’ll need the access token. You can find this under the Bot tab from developer portal.
Furthermore, we’ll code this in a way that we won’t reveal this token inside our code. Therefore, we’ll make a separate auth.json file and store it inside there. In our python code, we’ll make a function which will read this file and get the token.
Along with all that, we’ll also import all the necessary libraries, like with any other python project.
import os
import json
import asyncio
import discord
from discord.ext import commands

ROOT = os.path.dirname(__file__)

def get_token(token_name):

    auth_file = open(os.path.join(ROOT, 'auth.json'))
    auth_data = json.load(auth_file)
    token = auth_data[token_name]
    return token
Now, we’ll need to define which message should our bot watch and track the reactions on it. Furthermore, we’ll also need to define the exact reaction emoji will trigger it to give user the role.
For the message, we’ll simply copy message ID from Discord and set it as variable value. While for the emoji and role, we’ll create a dictionary, where emoji value will be the key and role ID the value.
role_message_id = 0 # Specific message ID
emoji_to_role = {
    discord.PartialEmoji(name='💰'): 0 # Role ID
}
Next, we’ll set the bots instance along with its intents.
intents = discord.Intents.default()
intents.members = True

bot = commands.Bot(
    command_prefix=commands.when_mentioned_or('!'),
    description='Bot that manages roles.',
    intents=intents
)
Okay, now we’re ready to code the functionality of our bot. In order for our bot to add or remove a role to/from the user, we’ll need to use on_raw_reaction_add and on_raw_reaction_remove functions.
Because we’ll reuse majority of the logic in both of these functions, we’ll also define another function that will handle what they have in common.
def get_reaction_user_and_role(payload):
    guild = bot.get_guild(payload.guild_id)
    if guild is None:
        return

    try:
        role_id = emoji_to_role[payload.emoji]
    except KeyError:
        return

    role = guild.get_role(role_id)

    if role is None:
        return

    member = guild.get_member(payload.user_id)

    return member, role

@bot.event
async def on_raw_reaction_add(payload):
    if payload.message_id == role_message_id:
        member, role = get_reaction_user_and_role(payload)
        try:
            await member.add_roles(role)
        except discord.HTTPException:
            pass

@bot.event
async def on_raw_reaction_remove(payload):
    if payload.message_id == role_message_id:
        member, role = get_reaction_user_and_role(payload)
        try:
            await member.remove_roles(role)
        except discord.HTTPException:
            pass
Finally, all we have to add now is the code that will run it.
async def main():
    async with bot:
        await bot.start(get_token('discord-token'))

asyncio.run(main())
That’s it! Now the bot should automatically add and remove the role you setup inside emoji_to_role dictionary. You can also add multiple emojis and roles inside that dictionary, so you’re not limited just to one.
Conclusion
To conclude, we made a simple reaction role Discord bot, that can manage roles for users when they react to a specific message. I learned a lot while working on this project and I hope it proves to be helpful to you as well.