How To Use WordPress REST API With Python – GET And POST
In this post, we’ll make a couple of functions in Python for utilizing WordPress REST API. Furthermore, we’ll implement one for fetching information of all posts on a blog and another to create a new post.
Additionally, we can fetch information of published posts from any wordpress blog without username and API key. This is because, that information is already publicly available. However, some of this data may not be displayed in the frontend of the blog.
Setting up the WordPress API
As we already mentioned, we don’t need any special credentials to access publicly available data. However, we do need it for creating new posts. Furthermore, we’re going to use a WordPress feature – Application Passwords, for generating an API key.
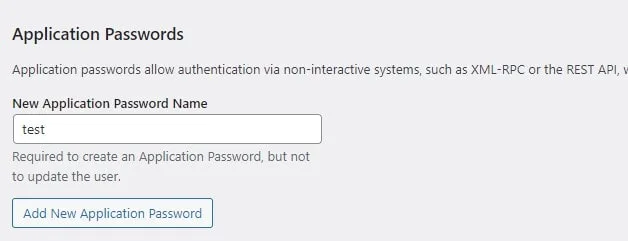
This key will allow us to access our blog as the user without using the users password. Furthermore, you can find this feature under the user profile settings. In case you don’t have this feature, you’ll need to install Application Passwords plugin.
In addition, this functionality is a part of WordPress only since December 2020, when it was released with WordPress version 5.6.
Writing Python code
First of all, like with any other Python project, we need to import all the necessary packages.
import os
import json
import base64
import requests
import datetime
from datetime import timezone
Alright, now we need to implement a function that will retrieve our credentials from a separate file. The purpose of this is so we don’t reveal them in the script directly. Additionally, I saved my API key and username in a json file in the same directory as my Python script.
ROOT = os.path.dirname(__file__)

def get_tokens(token_name):
    with open(os.path.join(ROOT, 'auth.json'), 'r') as auth_file:
        auth_data = json.load(auth_file)
        tokens = auth_data[token_name]
        return tokens

wp_access = get_tokens('wordpress')
Next, we’ll setup the connection by using these credentials, which we’ll need later for posting to our blog. We’re also going to set the URL endpoint for accessing posts database.
Keep in mind that you’ll need to use your own URL endpoint for your blog, which is will be the URL of your blog followed by /wp-json/wp/v2/posts.
wp_connection = wp_access['user'] + ':' + wp_access['key']
token = base64.b64encode(wp_connection.encode())

headers = {
    'Authorization': 'Basic ' + token.decode('utf-8')
}

api_url = 'http://127.0.0.1/wp-json/wp/v2/posts'
Utilizing WordPress API with Python
Now that we have everything setup, we’re going to start with getting all the posts information. This step includes iterating through pages of posts and storing their information into array. Furthermore, we can set the number of posts per page, which will also affect how many pages there will be.
To explain why this is important, our function will make 1 request per page. Therefore, more pages means more requests, which also means it might take longer to fetch all the posts information.
def get_posts(api_url):

    posts = []
    page = 1

    while True:
        response = requests.get(api_url, params={'page': page, 'per_page': 100})

        if not response.status_code == 200:
            break

        posts += response.json()
        page += 1

    return posts

response = get_posts(api_url)
for post in response:
    print(post['title']['rendered'])

print('Total posts:', len(response))
Alright, now let’s get to creating posts with our Python code. As we mentioned before, we’ll need the headers dictionary including the credentials information for this step. Furthermore, we’ll need to make a simple POST request and include all the information, such as new post data (title, content, slug, status,… etc.), and headers dictionary.
def create_new_post(new_post):

    response = requests.post(api_url, json=new_post, headers=headers)

    if response.status_code == 201:
        print(f'Just posted: {response.json()["title"]["rendered"]}')
    else:
        print('Oops, something went wrong.')

new_post = {
    'date': datetime.datetime.now(timezone.utc).strftime('%Y-%m-%d %H:%M:%S'),
    'title': 'This post was posted using python',
    'slug': 'this-is-python-post',
    'content': "<!-- wp:paragraph -->Lorem Ipsum is simply dummy text of the printing and typesetting industry. Lorem Ipsum has been the industry's standard dummy text ever since the 1500s, when an unknown printer took a galley of type and scrambled it to make a type specimen book. It has survived not only five centuries, but also the leap into electronic typesetting, remaining essentially unchanged. It was popularised in the 1960s with the release of Letraset sheets containing Lorem Ipsum passages, and more recently with desktop publishing software like Aldus PageMaker including versions of Lorem Ipsum.<!-- /wp:paragraph -->",
    'status': 'publish'
}

create_new_post(new_post)
In addition, if you want to format your content to fit the Gutenberg editor, you’ll need to use the special comment tags.
Here are some of the tags you might find useful:
- <!– wp:paragraph –> <p>This is a paragraph block.</p> <!– /wp:paragraph –>
- <!– wp:heading –> <h2>This is a heading block.</h2> <!– /wp:heading –>
- <!– wp:image –> <figure><img src=”img.jpg” alt=”An image”/></figure> <!– /wp:image –>
- <!– wp:list –> <ul> <li>Item 1</li> <li>Item 2</li> </ul> <!– /wp:list –>
- <!– wp:quote –> <blockquote>This is a quote block.</blockquote> <!– /wp:quote –>
- <!– wp:code –> <pre><code>// This is a code block</code></pre> <!– /wp:code –>
- <!– wp:embed –> <div class=”wp-block-embed”> Embedded content (e.g., videos, tweets) goes here. </div> <!– /wp:embed –>
Here is also the entire code of this project.
import os
import json
import base64
import requests
import datetime
from datetime import timezone

ROOT = os.path.dirname(__file__)

def get_tokens(token_name):
    with open(os.path.join(ROOT, 'auth.json'), 'r') as auth_file:
        auth_data = json.load(auth_file)
        tokens = auth_data[token_name]
        return tokens

wp_access = get_tokens('wordpress')

wp_connection = wp_access['user'] + ':' + wp_access['key']
token = base64.b64encode(wp_connection.encode())

headers = {
    'Authorization': 'Basic ' + token.decode('utf-8')
}

api_url = 'http://127.0.0.1/wp-json/wp/v2/posts'

def get_posts(api_url):

    posts = []
    page = 1

    while True:
        response = requests.get(api_url, params={'page': page, 'per_page': 100})

        if not response.status_code == 200:
            break

        posts += response.json()
        page += 1

    return posts

response = get_posts(api_url)
for post in response:
    print(post['title']['rendered'])

print('Total posts:', len(response))

def create_new_post(new_post):

    response = requests.post(api_url, json=new_post, headers=headers)

    if response.status_code == 201:
        print(f'Just posted: {response.json()["title"]["rendered"]}')
    else:
        print('Oops, something went wrong.')

new_post = {
    'date': datetime.datetime.now(timezone.utc).strftime('%Y-%m-%d %H:%M:%S'),
    'title': 'This post was posted using python',
    'slug': 'this-is-python-post',
    'content': "<!-- wp:paragraph -->Lorem Ipsum is simply dummy text of the printing and typesetting industry. Lorem Ipsum has been the industry's standard dummy text ever since the 1500s, when an unknown printer took a galley of type and scrambled it to make a type specimen book. It has survived not only five centuries, but also the leap into electronic typesetting, remaining essentially unchanged. It was popularised in the 1960s with the release of Letraset sheets containing Lorem Ipsum passages, and more recently with desktop publishing software like Aldus PageMaker including versions of Lorem Ipsum.<!-- /wp:paragraph -->",
    'status': 'publish'
}

create_new_post(new_post)
Conclusion
To conclude, we made a simple Python script for getting and posting data to a WordPress blog using WordPress REST API. I learned a lot while working on this project and I hope it proves itself helpful to you as well.