How To Post To a Page Using Facebook Graph API With Python
In this post, we’ll make a Python script for creating posts on a Facebook page by using Facebook Graph API. Furthermore, this tutorial will include the process of getting the access token, which is essential for this project to work.
Tools such as Facebook Graph API open a door to automation for content creators, bloggers, and businesses. Additionally, you can pair it with other APIs to bring data and content to your followers and expand your reach.
One such idea would be to pair it with OpenAI API to create engaging posts with GPT models, which have wide veriety of capabilities.
Getting the access token
First thing you’ll need is a developer account on Meta for Developers portal. After you setup your account, you’ll need to create an app. Usually, this should be a part of your setup process, because Facebook guides you through it by default.
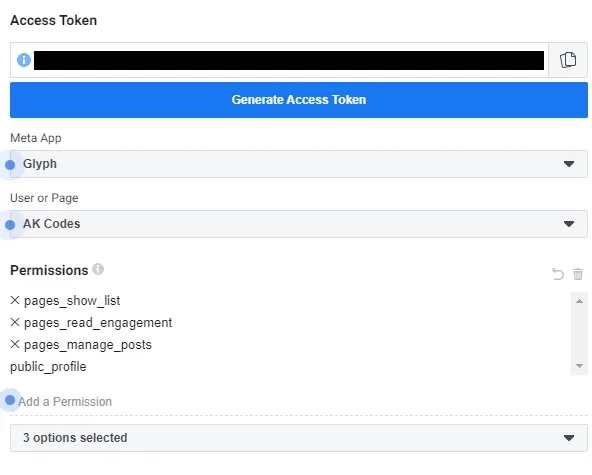
Next, you’ll need to go to the Graph API Explorer, which you can find under Tools in the main menu. Here you’ll be able to generate an access token by selecting the app you just created, adding permissions, and which type of token you want – User or Page.
Selecting the type of token is important, so pay attention to what you pick. To clarify, if you want to post on your Profile, you choose User token, and if you want to post on a Facebook page you own, you pick Page token.
In our case here, we’ll be posting to a Facebook page. Because I want to post on my page, I needed to add both pages_read_engagement and pages_manage_posts permissions. After I setup everything, I just clicked Generate Access Token button.
Using Facebook Graph API with Python
Alright, now that we have our token, we can start coding our project. First of all, like with any Python project, we need to import all the necessary libraries. We’ll need a couple of utility libraries for accessing and reading files, and we’ll need the Facebook-SDK library to use the Facebook Graph API.
Furthermore, you can install this library with pip by using the following command:
pip install facebook-sdk
import os
import json
import facebook
Next thing we need to do is save our access token to a separate json file, which we’ll read everytime we need to get the token value. The purpose of this is so we don’t reveal the access token inside the Python script in case you’ll want to share it with others.
Therefore, we’ll need to write a function that will read the json file and retrieve the token value.
ROOT = os.path.dirname(__file__)

def get_token(token_name):
    with open(os.path.join(ROOT, 'auth.json'), 'r') as auth_file:
        auth_data = json.load(auth_file)
        token = auth_data[token_name]
        return token
Now the last thing we need to setup is to create an instance of Graph API object, which takes the token value as an argument.
graph = facebook.GraphAPI(get_token('facebook-token'))Finally, we’re ready to start posting, which we can do so with the following function.
graph.put_object(
    "me",
    "feed",
    message="Hello everyone, I just posted this with python.",
    link="https://ak-codes.com/"
)
After the code executes, you should be able to see your brand new post on your Facebook page wall.

Here is also the entire code of this project.
import os
import json
import facebook

ROOT = os.path.dirname(__file__)

def get_token(token_name):
    with open(os.path.join(ROOT, 'auth.json'), 'r') as auth_file:
        auth_data = json.load(auth_file)
        token = auth_data[token_name]
        return token

graph = facebook.GraphAPI(get_token('facebook-token'))

graph.put_object(
    "me",
    "feed",
    message="Hello everyone, I just posted this with python.",
    link="https://ak-codes.com/"
)
Conclusion
To conclude, we made a simple Python script for posting on a Facebook page using Facebook Graph API functionalities. I learned a lot while working on this project and I hope it proves itself helpful to you as well.