
How To Make A Simple Classification Model
Machine learning has become a very developed field throughout the years. Furthermore, it gave rise to models that are able to solve all sorts of problems. And classification is one of the basic tasks that such a model can solve.
In this post, I’m going to show you a step-by-step guide to making a simple binary classification model. Furthermore, binary classification task requires a model to classify between 2 classes only.
For the sake of this tutorial, I’m going to use a well known titanic dataset, with which we’re going to make a model that predicts whether a person under certain circumstances survived the tragedy or not.
How To Use Kaggle
First of all, if you’re not familiar with Kaggle, it’s a sort of social media network for data scientists. You can find a vast collection of datasets freely available to experiment with.
But that is not all, you can also participate in competitions to earn prizes, check out other members’ notebooks where you can find code that they published and learn from more experienced people in the field.
You can download datasets from Kaggle in a few different ways:
- one is directly from the website,
- another way is by “kaggle” command from your terminal and
- the one we will use is within python script.
Setup Kaggle API Library and Token
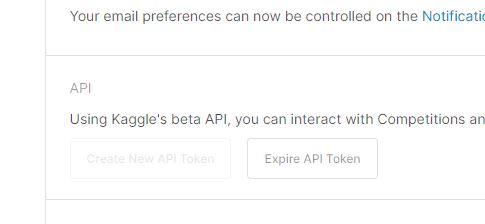
First of all, if you haven’t already, you’ll need to execute “pip install kaggle” command to install Kaggle library into your environment. After that, you’ll need to go to your account page on Kaggle and click Create New API Token, which will download a json file with your API token inside.
This will automaticaly download and place your kaggle.json file inside C:/Users/Your-Username/.kaggle folder. Furthermore, whenever you’re going to make API calls, you won’t have to point to this file from your python script as it is already taken care of when you install the library.
Authenticate API and Download the Dataset
This step is super simplified when you’re using python, since Kaggle library takes care of everything. All you need to do is import a KaggleApi class, use its functions to authenticate it and download your desired dataset by providing a url part that points to it and its file name.
from kaggle.api.kaggle_api_extended import KaggleApi
api = KaggleApi()
api.authenticate()

api.dataset_download_file(
    'brendan45774/test-file',
    file_name='tested.csv'
)
Preprocess the Dataset
This step varies from dataset to dataset, since they are not all the same, so we need to prepare it in a correct format for our classification model to accept it.
So in our case, first thing we need to do is read the csv file (comma separated values file) with pandas library, which will return a pandas dataframe.
Furthermore, we’re going to remove columns with data that doesn’t provide any value for our classification problem, drop rows that are missing any values and split the dataset into features and labels.
dataset_path = os.path.join(os.path.dirname(__file__), 'tested.csv')

dataset = pd.read_csv(dataset_path)

#exclude irrelevant columns
dataset.pop('PassengerId')
dataset.pop('Name')
dataset.pop('Cabin')
dataset.pop('Ticket')

dataset = dataset.dropna()

dataset_features = dataset.copy()
dataset_labels = dataset_features.pop('Survived')
Preprocessing Dataset with Mixed Datatype Values
Since the dataset we’re working with contains columns with different datatype values, we need to take extra steps. Which means, that we need to prepare these datatypes so our model will be able to accept them.
The following function will take care of this and will return a dictionary of preprocessed dataset features, preprocessing layers and formated inputs for these layers.
First, we need to preprocess dataset features by simply converting their values into numpy array.
Second we need to create preprocessing layers or steps that will be compatible with our model. Therefore, we will change object datatype values into tf.string datatype and int datatype values into tf.float32 datatype.
And lasty, we need to convert string values into one hot vectors. Furthermore, this is necessary because we can’t feed text directly into our model.
def preprocess_dataset(dataset_features):
    #preprocess mixed datatype inputs
    inputs = {}

    for name, column in dataset_features.items():
        dtype = column.dtype
        if dtype == object:
            dtype = tf.string
        else:
            dtype = tf.float32

        inputs[name] = tf.keras.Input(shape=(1,), name=name, dtype=dtype)

    numeric_inputs = {
        name: input for name, input in inputs.items() if input.dtype == tf.float32
    }

    x = tf.keras.layers.Concatenate()(list(numeric_inputs.values()))
    norm = tf.keras.layers.Normalization()
    norm.adapt(np.array(dataset_features[numeric_inputs.keys()]))
    all_numeric_inputs = norm(x)

    preprocessed_inputs = [all_numeric_inputs]

    #convert string datatype columns data to one hot vectors
    for name, input in inputs.items():
        if input.dtype == tf.float32:
            continue

        lookup = tf.keras.layers.StringLookup(vocabulary=np.unique(dataset_features[name]))
        one_hot = tf.keras.layers.CategoryEncoding(num_tokens=lookup.vocabulary_size())

        x = lookup(input)
        x = one_hot(x)
        preprocessed_inputs.append(x)

    preprocessed_inputs_cat = tf.keras.layers.Concatenate()(preprocessed_inputs)
    dataset_preprocessing = tf.keras.Model(inputs, preprocessed_inputs_cat)

    dataset_features_dict = {
        name: np.array(value) for name, value in dataset_features.items()
    }
    return dataset_features_dict, dataset_preprocessing, inputs
Create and Train Classification Model
In order to create our model, we’re going to write a function that will put together all the layers and compile it.
For this particular case, we’re going to use a simple model architecture for binary classification.
def create_model(preprocessing_head, inputs):

    body = tf.keras.Sequential([
        tf.keras.layers.Dense(64),
        tf.keras.layers.Dense(1)
    ])

    preprocessed_inputs = preprocessing_head(inputs)
    result = body(preprocessed_inputs)
    model = tf.keras.Model(inputs, result)

    model.compile(
   loss=tf.keras.losses.BinaryCrossentropy(from_logits=True),
        optimizer=tf.keras.optimizers.Adam(),
        metrics=['accuracy']
    )

    return model
Once we have the dataset and model ready, we need to use fit method on our model and wait.
Training Classification model
#train model
dataset_features_dict, dataset_preprocessing, inputs = preprocess_dataset(dataset_features)
model = create_model(dataset_preprocessing, inputs)
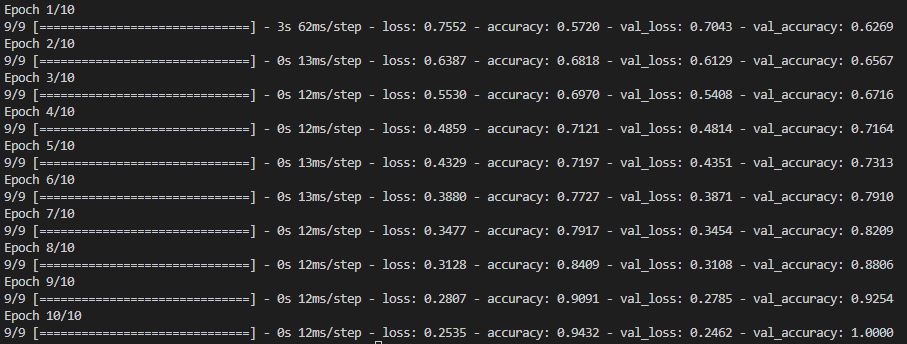
model.fit(
dataset_features_dict,
dataset_labels,
epochs=10,
batch_size=32,
validation_split=0.2
)
And for the last step in the training process, we need to save our model. Furthermore, this is an important step, which will allow us to use our trained model later.
#save model
model.save('titanic_test')
Use the Classification Model
The following step will demonstrate how to use our model by loading it and feeding it some test data. In order to display models predictions, we’ll need to process our predictions data from our model.
reloaded = tf.keras.models.load_model('titanic_test')

test_data = {
    'pclass': [1],
    'sex': ['female'],
    'age': [36.0],
    'sibsp': [0],
    'parch': [3],
    'fare': [214.2555],
    'embarked': ['Q']
}

test_data = pd.DataFrame(test_data)

test_features_dict, _, _ = preprocess_dataset(test_data)

raw_predictions = reloaded.predict(test_features_dict)

predictions = []

for prediction in raw_predictions:
    prediction = np.round(prediction)

    if prediction <= 0:
        prediction = 0
    elif prediction >= 1:
        prediction = 1

    predictions.append(prediction)

labels = {
    0: 'Dead',
    1: 'Survived'
}

predictions = [labels[p] for p in predictions]

for p in predictions:
    print('State:', p)
You can include code in this step in a separate file, so you can use it for more practical purposes.
Conclusion
I hope this guide helped you gain a better understanding on how machine learning works. I’m also going to include the entire project below in a zip file.
For complete transperency, I’m going to lock this zip file with a survey, so please consider downloading it.
Project package will include 3 python scripts:
- one for preprocessing data
- one for creating and training classification model
- and one for using the pretrained model
Project is structured in a way, so you can put it to practical use.
Thank you for your time.
Simple Classification Model Example