
How To Make A ChatGPT Discord Bot With LangChain
In this post, we’ll be making a Discord bot, which we’re going to connect to OpenAIs ChatGPT model (gpt-3.5-turbo). Additionally, we’ll also give it access to the internet, so it’ll be aware of up to date state of things.
Furthermore, Discord API offers us a lot of options and tools to create bots for all kinds of purposes. For example, it’s been quite popular for playing music in voice channels and giving users access to certain channels.
Prerequisites
Like any other python project, first thing we need to do is import all the necessary libraries and tools. Following tools will enable us to fetch API keys from a separate file, create a basic structure for a working Discord bot, and build a chatbot structure using LangChain.
import os
import json
import asyncio
import discord
from discord.ext import commands

from langchain.chat_models import ChatOpenAI
from langchain.memory import ConversationBufferWindowMemory
from langchain.utilities import SerpAPIWrapper
from langchain.agents import initialize_agent, AgentType, Tool
Next, we’ll need to define the function that will fetch an API key from a separate .json file. This way you can keep track of all API keys in your project. Additionally, it allows you to hide them with .gitignore file in case you’re uploading your work into public repository on GitHub.
ROOT = os.path.dirname(__file__)
def get_token(token_name):

    auth_file = open(os.path.join(ROOT, 'auth.json'))
    auth_data = json.load(auth_file)
    token = auth_data[token_name]
    return token

os.environ['OPENAI_API_KEY'] = get_token('openai-token')
os.environ['SERPAPI_API_KEY'] = get_token('serpapi-token')
As we mentioned before, we’ll also give the bot access to the internet, so we’ll need to use SerpAPI to do that. Furthermore, using API keys with LangChain is fairly simple, since you can define them with environment variables.
Defining ChatGPT components for our Discord bot
There are a couple of things we’ll need to add into the mix to make our bot behave intelligently. In order to connect our bot to the internet, we’ll need to define a tool, which our chatbot will use to browse the web.
Then, we’ll need to define all the core components, such as memory, large language model (LLM), and an Agent, which pools it all together.
search = SerpAPIWrapper()
tools = [
    Tool(
        name='Current Search',
        func=search.run,
        description='useful for when you need to answer questions about current events or the current state of the world. the input to this should be a single search term.'
    )
]
memory = ConversationBufferWindowMemory(memory_key='chat_history', return_messages=True)
llm = ChatOpenAI(temperature=0.9)

agent = initialize_agent(
    tools=tools,
    llm=llm,
    agent=AgentType.CHAT_CONVERSATIONAL_REACT_DESCRIPTION,
    memory=memory
)
Setting up Discord Cog
In this section, we’ll make a class in which we’ll define our Discord bot command. The purpose of this command is to take an argument and pass it as a prompt for our chatbot. Furthermore, we’ll make a hybrid command, which means we can use it in a few different ways.
We can use the command by:
- mentioning the bot in chat, followed by the name of the command and prompt (@botusername command_name prompt)
- writing an exclamation mark (!) before the command name and prompt (!command_name prompt)
- slash command (/command_name prompt)
class Chat(commands.Cog):
    def __init__(self, bot):
        self.bot = bot

    @commands.hybrid_command(name='chat')
    async def chat(self, ctx, *, prompt):
        async with ctx.typing():
            response = agent.run(input=prompt)

        await ctx.send(f'<@{ctx.message.author.id}> says: {prompt}\n\n{response}')
Okay, now we have our functionality for our command, but there is still more to take care of for our bot to work. Next, we need to define intents and create a bot instance.
intents = discord.Intents.default()
intents.message_content = True
bot = commands.Bot(
command_prefix=commands.when_mentioned_or('!'),
description='A chatbot with access to the internet',
intents=intents
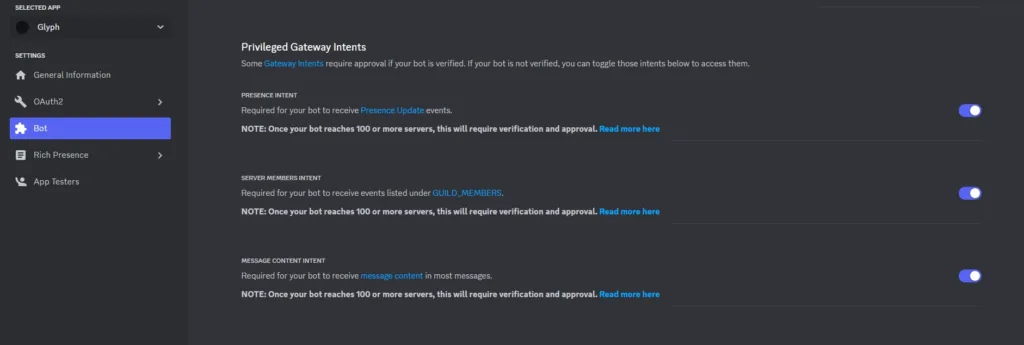
)In case you’re having any troubles with intents, you need to check if you have them turned on/approved in the Discord application settings under Bot tab.
Next, we need to register our hybrid command within our bot tree, so we’ll be able to use the slash commands for it.
The following function fires everytime you run the bot script.
@bot.event
async def on_ready():
    print(f'Logged in as {bot.user} (ID: {bot.user.id})')
    print('--------------------')
    await bot.tree.sync()
Bring the ChatGPT Discord bot to life
Finally, we’re at the stage to run this thing and test it out. In the following function, we add the Cog functionality with the command to the bot instance and start it.
async def main():
    async with bot:
        await bot.add_cog(Chat(bot))
        await bot.start(get_token('discord-token'))

asyncio.run(main())
And here is the final result.
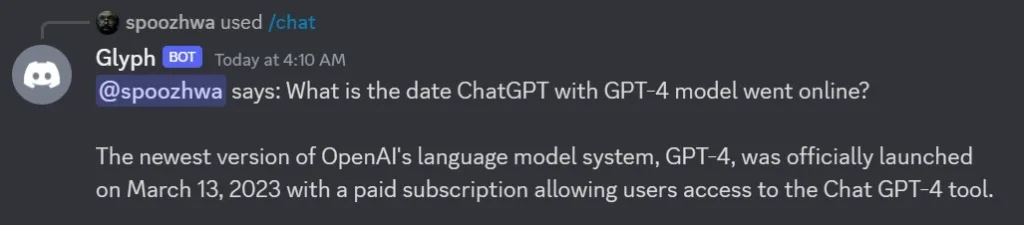
As we can see, it browsed the internet to retrieve this information, since it wasn’t trained to know this answer. Looks like this thing works!
Conclusion
To conclude, we made a simple, but powerful Discord bot powered by the same model that ChatGPT uses. I learn a lot while working on this project and I hope this tutorial proves to be helpful to you as well.